Scrivener is a wonderful tool. It is rich and versatile. Because of that, you can use it to support the way YOU write. Because it is so robust, some people find it intimidating at first, I’m writing a series of blog posts to help you get started.
This post will provide easy, step-by-step instructions for installing Scrivener and then setting it up to backup your books/screenplays in the Cloud so you never have to worry about losing your work. You can grab it alongside other files online, using sites similar to Fileproto.com or by going to their official page.
?? Why use the Cloud? ??
So you NEVER lose your files!
When My laptop crashed and would only show me the blue screen of death after a hard day of writing, I panicked– but only a little. This error, also known as a driver power state failure, was something I later resolved by doing some digging around in forums and useful tutorial sites online.
I immediately borrowed my dad’s computer, logged into my Dropbox account out on the cloud, and was able to verify that every single word I had written that day was safe and sound.
What a relief! ?
When I bought my new computer, I immediately installed both Scrivener and Dropbox. I synchronized my Dropbox files so they all downloaded onto my new computer, and I was quickly up and running without a hitch.
It can be this easy for you to recover from a catastrophe too. Just create an account on Dropbox (or iCloud or OneDrive or some other cloud service you trust will still be there in ten years), set up Scrivener so it stores all your books in your Dropbox folder, and you’re set. If you’re creating files that need to be shared with clients of yours – perhaps they’ve commissioned you to write for them – you may want to use a more professional and secure solution for providing them with the necessary files, and a client portal (like this – https://www.filecenterdms.com/info-sharefile-alternative-and-replacement.html) could be the ideal way of doing this.
How to do it
I write fiction, so my examples will focus on Scrivener’s fiction template, but these steps apply to screenplay writers and non-fiction authors as well.
- Install Scrivener on your computer. You can download it for free from the www.literatureandlatte.com website. There is a Windows version and a Mac version. Although Literature and Latte provides regular software updates for free, the two versions are a bit different, so you have to buy them separately. Just click to download, then click the downloaded file to install it. Easy-peasy!
Once you download and install Scrivener, you can use it for FREE for 30 days. That is 30 days of USE, not 30 calendar days. Those people at Literature and Latte are very generous!
If you complete NaNoWriMo, one of the prizes is a discount on Scrivener, so get writing!
- First, if you haven’t ever created a cloud account, you’ll need to do that now. You can go to www.dropbox.com and download it.
- Install it by double-clicking on the downloaded file.
- It will create a folder named Dropbox on your computer.
- Any files you put in that new Dropbox folder on your computer will automatically be synchronized up on the cloud (as long as you’re connected to the internet). ? It’s like magic! (Or advanced technology… either/or ?)
- You can access your Dropbox files directly from your computer and you don’t need to go to the Dropbox website again.
In my Dropbox folder, I created a couple of folders I use all the time.
Scrivener, and Books.
- My Scrivener folder is where I keep all of my backups as well as some other things such as custom templates. I created a subfolder called Scrivener Backups and another one called Templates. (I discuss Templates in a different article.)
- My Books folder is where I create sub-folders for each book series, and then more subfolders for each book in that series, like this:

(See how the Dropbox folder is highlighted on the left side of my screenshot above? Make sure you’re using this folder for anything you want to synchronize to Dropbox!)
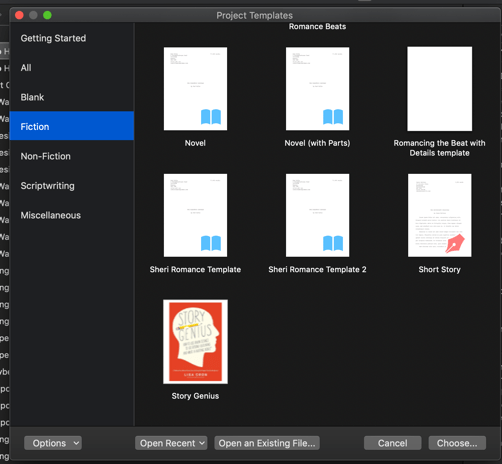
Now it’s time to Open Scrivener!
The first time you open Scrivener, the screen will look a lot like this. Since I write novels, I always choose one of the Fiction templates. For this example, I’ll use the “Novel” template. (You’ll notice I have a couple of non-standard templates on my screen. Make sure you check out my other article to learn more about templates). The Romancing the Beat template and the Story Genius Template are provided as free downloads by some extremely generous authors. You can find links to them in my Template article.

Set up your Backups to go to the Cloud! ??
Now, all you need to do is tell Scrivener where to backup your files automatically.
At the top-level system menu (not the menu inside Scrivener), go to Scrivener: Preferences: Backup

Click on the Backup icon on the far right:

These are all your backup options
Find the box labeled: Backup Location. Click “Choose” and set it to the backup folder you want to use in your Dropbox folder. In my case, I chose the path Dropbox/Scrivener/Scrivener Backups

As you can see in the image above, Scrivener has created a zip file backup for each of my books.
Feel free to adjust the number of backups Scrivener should save. I have mine set up to keep the 10 most recent backups of each manuscript. (The ones with fewer backups in my image above are either newer manuscripts or manuscripts I subsequently renamed.)
?? Now you can write in Scrivener and know that even if you lose your laptop or it crashes on you, all your files are still safe and secure! Thanks to the amazing cloud! ??

